Table of Contents
Adding Contact in Sharpspring SOP #
Purpose #
The purpose of this document is to have a step by step procedure or guide on how to add contacts in Sharpspring.
Scope #
This SOP document is for the marketing assistant/support that helps Josh in sales in adding contacts that are not yet inside Sharpspring.
Definitions & acronyms #
- Sharpspring: It’s a Customer Relationship Management software that offers a complete marketing automation system with a powerful built-in CRM application.
Procedures #
See video here for a complete How To resource.
Step-by-step instructions #
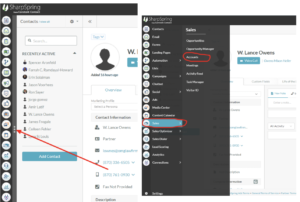
- Step 1: Log in to your Sharpspring account and click “+Contact” button at the upper right corner of your screen.
- Step 2: Enter the contact information such as Name, Email address, Phone number and Company/Law Firm Name. Then click “Save”.
- Step 3: Complete the contact information by adding Contact Title, Fax number(if they have), Industry(their services), Office phone number, Website address, and Location. Then click “Save” button at the upper right corner of your screen.
Tip:Search for their website or GBP listing in order to find these information.
- Step 4: Once you’re done completing the contact information, what you will do next is to add the Account Name or their Law Firm Name. In order to do that, hover your mouse over the 3 dots on the left navigation so that you can see the other menu or options. Look for Sale, then click “Accounts”.
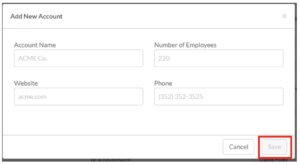
- Step 5: Click “+Account” button in order to add another account.
- Step 6: Enter the Account name which is the Law Firm Name, Website link and their Office Phone Number, then click “Save”.
- Step 7: Add a contact by clicking the “add a contact” box and search for the contact name then click it. The contact will automatically be added to the Account Name.
- Step 7: Complete the Company information and the Billing Address/Primary Address. Then click “Save Changes” button at the bottom right side of your screen in order to save all the information added.
* When you go back to the contact, you can see that the Account Name is already added.


