Table of Contents
Open Ticket to Schedule a Blog SOP
Purpose #
This template will provide the Content Support with an overview of how to open a ticket to schedule a blog.
Scope #
As a Content Support, you must know how to open a ticket with the web team to schedule a blog. Most clients have monthly blog publications while a few have bi-monthly blogs depending on their plan.
Definitions & acronyms #
- Ticket: a document that records interactions between a customer and a customer support team. A ticket is created and shared between the customer and the support rep when a customer submits a query. The ticket logs their communication on a thread that can be used as a reference by each party.
- Blog: A monthly or bi-monthly feature appearing as part of an online publication published on the website that typically relates to a particular topic and consists of articles and discussions by one or more authors.
- Client: The most important person in the agency. They are Law Firms from all over the United States that seek services from the agency to get more leads and eventually turn that leads into conversion to increase their revenues and profits.
Procedures #

Step-by-step instructions #
Describe the process in detail using flow charts and/or hierarchical checklists.
- Step 1: Once a blog is approved by the client and the blog image has been approved by the Content Manager, the Content Support proceeds to submit a ticket through the subtask in Teamwork.

- Step 2: Open all necessary documents and folders to submit a ticket to the web team.
- Step 2.1: Open the Google document of the blog (it is attached in the Internal Review subtask)

- Step 2.2: Open the Blog Images Folder (it is attached in the Image Selection subtask)

- Step 3: Before opening the ticket, make sure to review the content first.
- Step 3.1: Check if there is a meta description

- Step 3.2: Check if the hyperlinks are working and directing to a live site

- Step 3.3: Check and compare the NAP from the Master Sheet for accuracy

- Step 4: Hover to the “Open Ticket to Schedule/Publish Blog” subtask, and click on the Desk symbol that will appear. Click “Create a Ticket”

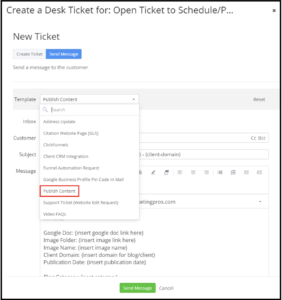
- Step 5: Select the Publish Content Template then fill out all the items.

- Step 6: After filling out the items, click Send Message.

- Step 6.2: Open the ticket in a new tab.

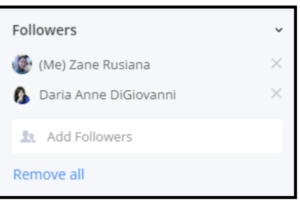
- Step 6.1: Add the content manager and yourself as the followers of the ticket

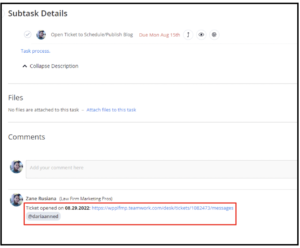
- Step 7: Copy the ticket’s URL then paste it into the comment section of the “Open Ticket to Schedule/Publish Blog” subtask. Add a date when the ticket was opened and tag the content manager.

- Step 8: Check off the subtask


