Master Google Local Service Tasks SOP #
Teamwork [GLS] – Google Local Service Template
Purpose #
The purpose of this document is to give detailed descriptions on how to process each task on the “Teamwork Master [GLS] – Google Local Service”. Each task will align with the corresponding number on this SOP document. Simply follow the instructions on each task item to complete your task. Should you have any questions, please contact your department manager and/or add it to the meeting agenda for the next meeting. Visit the weekly meeting agenda here.
Scope #
This document applies to the Google Local Service department.
Definitions & acronyms #
- First term: Google Business Profile (GBP) – Google Business Profile is an easy-to-use tool for businesses and organizations to manage their online presence across Google. To help customers find your business, you can verify your business and edit your business information.
- Second term: Bright Local – BrightLocal is a search engine optimization tool that tracks search rankings, builds citations, and monitors online reviews and stresses local search performance.
- Third term: Vendasta – Vendasta is the #1 platform for agency partners selling digital solutions to local businesses. By offering a marketplace of re-sellable products and services and an automated marketing platform, Vendasta’s channel partners are empowered to become cloud brokers by acquiring, retaining, and growing their client base.
Procedures #
Step-by-step instructions #
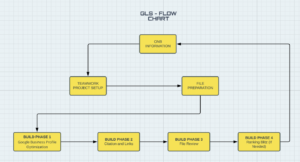
Describe the process in detail using flow charts and/or hierarchical checklists.
REFERENCE LINK – https://wpplfmp.teamwork.com/#/task-templates/2383339
Add Onboarding portion of GLS set up here
ONB- Google Local Service (GMB)
- add card (Client Name & Location) to board view https://wpplfmp.teamwork.com/app/projects/397950/tasks/board
- Set due date of 3 days
- Link card to GLS task list from main client master project
- Assign Eric & the account manger to each card
1.0 – Teamwork Project Set-Up #
- The department manager is responsible for this task
1.1 Ensure GLS List is Added to Master Project and Indicate Primary / Secondary Location
- The intake team will add your “[GLS] – Google Local Service” task list for you; however, you should confirm that it has in fact been added.
- If the list does not exist, communicate with the intake team to add the list.
Example: [GLS] – Google Local Service – (Miami) – (Primary Location)
Or [GLS] – Google Local Service – (Miami) – (Secondary Location)
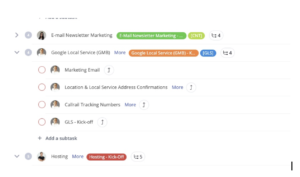
1.2 Check Off Tasks on the Google Local Onboarding – List Task name on [ONB] list: “Google Local Service (GBP)”
As described – ensure all tasks are checked off on the above mentioned task list.
- Check Off Tasks on the Google Local Onboarding – List Task name on [ONB] list: “Google Local Service (GMB)”.
- The intake/onboarding team will communicate with you on what onboarding tasks need to be completed and/or are pending; however, it’s up to you to ensure that the items listed above in the screenshot on the onboarding checklist are completed promptly.
- A marketing email will be provided during intake and can be found on the Client Master Folder. Sometimes there is a delay in receiving this information due to client’s responsiveness. Continue to follow up with the intake team until you receive it.
1.3 Add Client to Google Local Service Tracker and Assign To Local Team Member
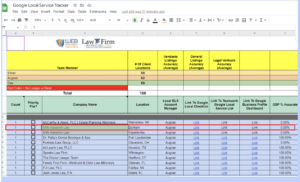
Add the client location to the Google Local Service Tracker, found here. Assign to Local Team Members.
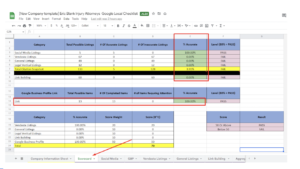
- Fill up Google local checklist company information sheet and make sure they are all accurate. Take info from the Intake PDF.
- Check Client master sheet for address confirmation
- Add client location to the service tracker once the Google local checklist has been filled out.
Example:
Once this is complete, then you will now add this location to the service tracker.
1.4 Task Assignment & Organization
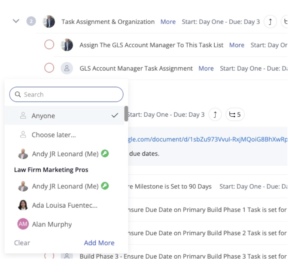
The GLS Account Manager is assigned to the project.
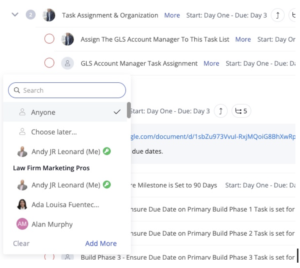
Once the project is assigned to the GLS Account Manager, they will then assign all tasks to themselves, and/or relevant team members. Example assign the video tasks to the video person.
1.4.1 Assign The GLS Account Manager To This Task List
- The GLS Account Manager is assigned to the project.
- Makes a comment to said GLS Account Manager.
- Once the project is assigned to the GLS Account Manager, they will then assign all tasks to themselves, and/or relevant team members.
1.4.2 GLS Account Manager Task Assignment
- The GLS Account manager will assign all tasks and sub-tasks to appropriate Google Local Team Members, including themselves.
- For example: Anything related to video such as YT channel, YT video or GBP video should be assigned to YouTube SEO Support. File Review should have the Department Manager assigned, Etc. Note: Some tasks will be pre-assigned on the template, in this case check to be sure the proper person is assigned.
1.5 Set Due Dates
- GLS Account Manager sets all due dates. Note: The milestone should be the only manual action here. The due dates should be pre set on the template and start when the project list is added to a client master project.
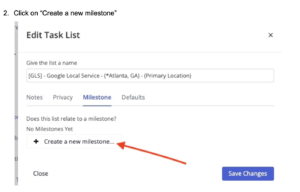
- Milestone – Ensure [GLS] – Google Local Service” task list Milestone is Set to 90 Days.
- Click on edit list
- Click on “Create a new milestone”
3. Set a date for 90 days from today and make yourself (account manager) responsible for the milestone.
4. Click on “Add Milestone” and the milestone will appear under the title of the list:
- Build Phase 1 – Ensure Due Date on Primary Build Phase 1 Task is set for 14 days
- Build Phase 2 – Ensure Due Date on Primary Build Phase 2 Task is set for 30 days
- Build Phase 3 – Ensure Due Date on Primary Build Phase 3 Task is set for 60 days
- Build Phase 4 – Ensure Due Date on Primary Build Phase 4 Task is set for 90 days
2.0 File Preparation #
This task involves preparing a new file. The key elements are listed below; this task should only be checked once all sub-tasks have been completed.
2.1 Confirm NAP(s) in Master Sheet
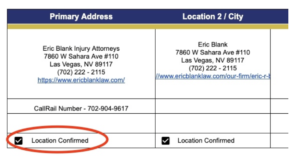
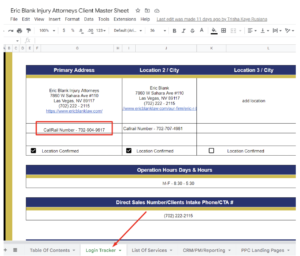
- Location and local service address will be listed on the intake and master sheet; however, it’s up to you to confirm that the information is accurate. Once confirmed, you will check off the box “Location Confirmed.” See the image below for a visual. To confirm the address and phone number, use the intake PDF created by the intake team after the client is onboarded and look at their GBP. If you are unsure of the primary address and phone number, communicate with the intake and CSM to get direct confirmation from the client. It’s a critical step to ensure we have the proper business name, address, and phone number.
- Go to the client’s shared folder.
- Go to 1. Intake – Login Tracker: Meeting and File Notes
- Locate the Master Sheet
- Locate the intake documents
- Review the information found within the intake documents (name, address, phone number, and website link)
- Visit the client’s Google Business profile in a separate tab – review the information (name, address, phone number, and website link)
- The intake team will provide CallRail tracking numbers.
2.2 Keyword List Confirmation
- Check this task off when you are notified by John that the keywords have been approved. You will be notified via Teamwork.
- To ensure keywords have been approved, visit the client’s shared folder.
- Go to 3. Keywords
- Go to the Keyword List Sheets file
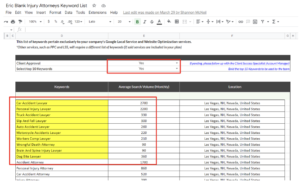
- Ensure “Client Approval” and “Select top 10 keywords” are both set to “Yes” (meaning they were approved by the client).
Example:
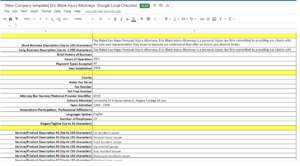
2.3 Complete Company Information Sheet tab in Google Local Checklist
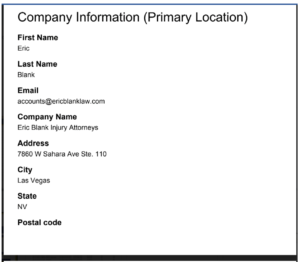
- The GLS Account Manager fills out all information in the Company Information Sheet tab in the Google Local Checklist using data obtained from the intake documents AND the confirmed keyword document (both found in the shared master folder).
- Instructional video: https://www.loom.com/share/231fd391c14643e8ad3686549f4dc054
- Once the GLS Account Manager adds all required information to the Company Information Sheet tab of the Google Local Checklist, this task can be marked as complete, and the GLS Account Manager notifies the GLS Department Manager that this task has been completed so that the following sub-task can be initiated.
2.3.1 Department Manager Review of Company Information Sheet Tab
- Go to the client’s shared folder.
- Go to 1. Intake – Login Tracker: Meeting and File Notes
- Open up the client intake documents.
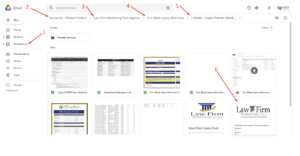
- Open the client’s Google Local Checklist in another tab (Shared Folders / Client’s Shared Folder / SEO / Local SEO & GMB / 1. Company Information – Master Task List
- Use information on the intake forms to complete the Company Information Sheet tab on the Google Local Checklist (triple check to make sure all of these details are accurate)
Guide:
Ensure that all the information from the intake PDF file is accurate and properly filled in the Google Local Checklist.
2.4 Gather / Optimize / Geotag Company Images
Instructions: https://drive.google.com/file/d/1KsgSOVqTyTSYMoiv1QvTwNaPm4VIK660/view?usp=sharing
Text Instructions:
- We need to acquire 10 images to use in the Google Local Service campaign; we can obtain these images using a variety of strategies, including:
- Visiting the company’s website to grab images
- Visiting the company’s Google Business Profile to grab images
- Visiting the company’s Facebook profile to grab images
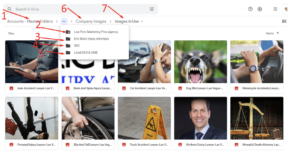
- Visiting the “Branding” shared folder within the client’s shared folder to see if there are any images available
Once you obtain 10 images, follow these instructions (note: you will need to download the free GeoSetter application to complete this task)
- Place all of the images in a folder on your desktop.
- Open up the Google Local Checklist – the link will be in the “Links” section of the Client Master Project.
- Open the “Company Information Sheet” tab in the Google Local Checklist, and scroll down to where you see the top 10 keywords.
- Rename the images using these top 10 keywords and the location. For example, “Immigration-Attorney-Richmond-VA-23294.jpg“, where you would use the top 10 keywords in addition to the location in the filename.
- Open up the GeoSetter program, and select the folder in which the images are located.
- Ensure the images are displayed on the dashboard of GeoSetter.
- Once the images are displayed, select “Images”, and then select “Select All”.
- Select “Images” once again, and then select “Edit Data”.
- Open up a new tab, and search the client’s office location in Google Maps.
- In the Maps view, find the client’s office location on the map – it will be indicated with a red marker. Right click this red market, and note the top numbers – these are latitude and longitude details (e.g. 43.87430712757357, -79.26013781546641)
- Add these numbers into the “Edit Data” screen in GeoSetter.
- Add the address to the bottom section where it says “Location”.
- Click on the “Categories / Keywords” tab, and add in the top 10 keywords found in the Company Information Sheet in the Google Local Checklist.
- Select “Set Current Values for All Selected Images”
- Click “All” on the right hand side.
- Click “OK”
- Click “OK” again, in the following screen.
- Click “Images” and then click “Save”. Your images should be optimized.
- To verify if the images are optimized, locate them on your desktop, right click the image, and select Properties and then Details. The keywords should be listed here, as well as the GPS coordinates.
- Once the images has been optimized, upload the files to the shared drive foldder “Company Images>Images in used”
2.5 Add Client To Bright Local + Run Ranking Report
- Add client location to Bright Local – complete all fields (gather information from Company Information Sheet tab in the Google Local Checklist)
- Sign into Bright Local using your login credentials (www.brightlocal.com)
- Bring up the client’s Google Local Checklist (Company Information Sheet Tab), which is found in their shared folder. The path is as follows: Client’s Master Folder / SEO / Local SEO & GMB / 1. Company Information – Master Task List / Google Local Checklist
- Once you are in the Bright Local dashboard, select “Add Location(s)”
- Select “Add Single Location / Add Location”
- Search for the business name / location name
- If found, select the option. If not found, manually enter this information
- Complete all information on the “Add a location” screen by using the information located in the Google Local Checklist (Company Information Sheet Tab)
- Select “Next”
- Continue to enter all required information
- Select “Finish”.
- Add Ranking Report link to Google Local Service Tracker
- Sign into Bright Local using your login credentials (www.brightlocal.com)
- Select the client and location from the list
- In the Dashboard (Location Summary), select “Rankings”, and then select “Rank Checker”.
- This is the link; copy this link and add it to the appropriate section of the Google Local Service Tracker (find the client name and address, and scroll to the far right to add the link). The Google Local Service Tracker can be found here: Google Local Service Tracker
- Create Ranking Report using the confirmed keyword list using the top 10 or 20 keywords plus geographic modifiers
- Sign into Bright Local using your login credentials (www.brightlocal.com)
- Locate the customer and location, and go to the Dashboard (Location Summary).
- In the left hand column, select “Rankings”, and then select “Rank Checker”
- Click “Monitor Search Rankings”
- Click “Monitor Search Rankings Only”
- This next screen will be where you set up the Ranking Report. When it asks “How often do you want this report to run?”, select “Monthly” and then select the last day of the month. This will create a scheduled monthly Ranking Report.
- You will obtain the keywords to add into the “Search Settings” section in the Client’s Master Folder. Follow this path: Accounts-Master Folder / 3. Keywords / [Customer Name] Keyword List
- Once you open this Google Sheets file, you will find a “Bright Local KW” tab at the bottom. Go into this tab, copy the list of keywords for the city you are setting up in Bright Local, and paste this list into the keyword section of “Search Settings” in Bright Local. There should be just under 100 keyword phrases included in this list.
- In the “Select the search engines you’d like to monitor”, select the Google items (Google / Google Mobile / Google Maps). Do not select Bing or Bing Local.
- Leave everything else as is, and click “Monitor Search Rankings”
- Run the Ranking Report to run on the last day of the month (scheduled, not ad hoc).
2.5.1 Local Search Grid Configuration
- Sign into Bright Local
- Instructions required
2.6 Add Client To Vendasta
- Sign into Vendasta
- Create a client account
- Existing GBP (The clients GBP already exists and is live): (specific to location – each location will require a unique account). Go to Businesses / Accounts / Create Account and use information found in the Company Information Sheet tab in the Google Local Checklist to complete
- New location (The client’s GBP does NOT exist). Follow this SOP: , Vendasta – Auto Verification (adding a brand new GBP listing) SOP
2.6.1 Notify Social Media Manager that Listing has been added to Vendasta
When a particular listing has been added or created and reviewed the information in Vendasta, Notify Alena in order for them to Trigger/Activate Products for Social media. Create a task on Teamwork or Notify via Slack Channel.
2.7 Google Business Profile – Existing Profile Process
- GBP access to our Google Local Team should have already been granted during the onboarding process by our Intake Team. If this has not yet been completed, please notify the CSM and the Intake Team via a ticket on this task (create a ticket directly from this task – use the Intake inbox on your ticket).
2.8 Local Viking
- Ensure listing has been added to the Local Viking dashboard
- Ensure notifications are on. NAP, website, hours, primary and additional phone, categories, etc
- Assign location to Google Local Account Manager within Local Viking
2.9 Social Media Account Creation (See description for a note on secondary locations)
- Gain access to social media accounts by contacting the social media department, if required; if not required, gain access (username and password)
Note: for secondary locations, only create facebook secondary locations. We will not be creating twitter or Linkedin for secondary locations. Check Twitter and Linkedin off for secondary locations as we do not build or create listings for secondary locations in these two social media platforms.
2.9.1 Facebook (if more than one location create locations in facebook, see how to for more info)
https://business.facebook.com/settings/pages/106702927897105?business_id=727916430669245
Access should be gained during onboarding. The task is to optimize facebook general page info.
UN: reviews@reviewgoole.com
PW: AnkekenIHI15489#$JKOE
2.9.2 – LinkedIn
Action: check to see if the client has a LinkedIn business page. If they do ensure its accurate, and if they dont or if they do but its not accurate, email the client to set it up or update the info. In other words, the client has to take this action them selves. The reason is that LinkedIn is difficult to access.
2.9.3 – YouTube
Action: Create YouTube profile utilizing the client’s Google Account from Master Sheet.
INSTRUCTION DOCUMENT
https://docs.google.com/document/d/1eCqnYeRN7DtsMIO6kBKu6tOIhE6zpVEthK2KaeduBnE/edit
2.9.4 – Instagram
Action: The Social Media team will create or provide access to the clients Instagram account.
2.9.5 – Twitter
Action: The Social Media team will create or provide access to the clients Instagram account.
Optimization Structure On Twitter: in the description use the following format.
name, address, phone number
3.0 Build Phase 1 – Google Business Profile #
3.1 Vendasta
Resource: Vendasta (Editing Business Listing & Adding Local SEO products) SOP
How to Video – https://www.loom.com/share/9824138727a74438a3cc561bb3497ebe
3.1.1 Add Business to Vendasta (or confirm its there) & Optimize Business Information
3.1.2 Manager Review – Vendasta Listing Builder – Edit Business Details If Necessary
3.1.3 Vendasta Data Aggregators – Listing Distribution
3.1.4 Vendasta Listing Sync Pro | USA (Monthly) Order
INSTRUCTION DOCUMENT
https://docs.google.com/document/d/1Mx_8d-V-eH-GlLw4wbUILVsVhMQFJjEbhx524CpqlrI/edit#
3.2 Video/Youtube
3.2.1 Youtube Channel (optimize)
- Check to see if there is an existing Youtube channel (check existing website for link, or search business name in Youtube and if one cannot be found, ask the CSM if they ask the client if they have an existing Youtube channel).
- If there is an existing Youtube channel, move to optimization,
- If there is not an existing Youtube channel, create one and optimize it.
INSTRUCTION DOCUMENT
https://docs.google.com/document/d/1eCqnYeRN7DtsMIO6kBKu6tOIhE6zpVEthK2KaeduBnE/edit
3.2.2 Optimize one YouTube video (the video that represents their business the best)
3.2.3 Create Google Business Profile Video
3.3 GBP Active
3.4 GBP – NAP is Accurate
- Go to the client’s shared folder
- Go to 1. Intake – Client Services
- Select the client’s Master Sheet
- Select the “Login Tracker” tab, and view the Name, Address, and Phone number displayed.
- Go back to the 1. Intake – Client Services folder and view the Client’s Intake Form (Part 2) (this will be a PDF file)
- Ensure the Name, Address, and Phone number on the intake form matches the Name, Address, and Phone number on the Master Sheet
- View the client’s Google Business Profile
- Ensure the Name, Address, and Phone number matches this information as well
- Finally, open up the client’s website. Confirm the Name, Address, and Phone number match here as well. (Note: it is possible that a tracking number will be utilized, so in some situations, the phone number will differ)
3.4.1 Confirm CallRail Tracking Number
- Go to the client’s shared folder
- Go to 1. Intake – Client Services
- Select the client’s Master Sheet
- Select the “Login Tracker” tab, and search for the Callrail number
- If present, check this task off. If not, alert the Department Manager.
3.5 GBP Info – Categories
3.6 GBP Info – Hours of Operation
3.7 GBP Info – Website
3.8 GBP Info – Appointment Links
3.9 GBP Info – Products
3.10 GBP Info – Services
3.11 GBP Info – Company Description
3.12 GBP Info – Other
3.13 GBP – Photos
3.13.1 Exterior Photos
3.13.2 Interior Photos
3.14 GBP – Videos
3.15 GBP – Website
3.16 Website Location Page Confirmation
- Visit the “Location Page Confirmations (Secondary Locations) sub task and click the “Desk” symbol to the far right.
- Create a ticket to request location page links are created.
- Within the ticket, follow the following instructions:
- Inbox – Select “Support”
- Customer – Select your name
- Subject – Enter client’s website link plus a description of the request (e.g. https://www.atltriallaw.com/ | Please create location pages)
- Message – Add in a description of your request (e.g. Please create location pages for this client’s Huntsville and Louisville locations – refer to Master Sheet for address details)
- Type – Request
- Source – Email (Manual)
- Status – Active
- Priority – Typically you would add in Medium here, but if it is critical you can enter High.
- Assigned – Assign this ticket to Amir
- Tags – search clients name and add client name tag.
3.17 Ensure Scorecard Is Updated
3.18 Quality Control – Ensure GBP Information is Complete, Accurate, and Optimized
3.19 Update Google Local Service Tracker
4.0 Build Phase 2 – Citations and Links #
4.1 Vendasta Listings
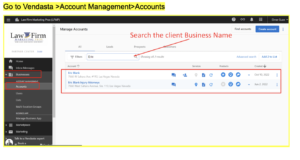
Go to Vendasta >Account Management>Accounts
Once you will find the client business Name, Click on business profile and click “Snapshot Report”.
4.2 General Listings
4.3 Legal Vertical Listings
4.4 Link Building
4.5 Ensure Scorecard is Updated
4.6 Update Google Local Service Tracker
4.7 Quality Control – Ensure GBP Information is Complete, Accurate, and Optimized
5.0 Build Phase 3 – File Review #
This Task includes overall reviews of citations, legal verticals and link building and general listings and make sure that the listings are live. For in process citations, make follow ups and update as much as possible in order to create live listings and claim it.
6.00 Phase 4 – Ranking Blitz (If needed) #
Ranking Blitz only applied to those clients that are having low rankings. This can be determined by running a report in Agency Analytics and Bright local. Andy and Elmer will handle the Blitz for the client.
====
OLD STUFF BELOW
Sub Task: Add Ranking Report link to Google Local Service Tracker
- Sign into Bright Local using your login credentials (www.brightlocal.com)
- Select the client and location from the list
- In the Dashboard (Location Summary), select “Rankings”, and then select “Rank Checker”.
- This is the link; copy this link and add it to the appropriate section of the Google Local Service Tracker (find the client name and address, and scroll to the far right to add the link). The Google Local Service Tracker can be found here: https://docs.google.com/spreadsheets/d/1jGfWd8iWkfe63QEzzWxpqymLuVQU8fcGYEtPJ8JC36Q/edit#gid=857602627

